
Hydraulic Clutch System Bleeding Procedures
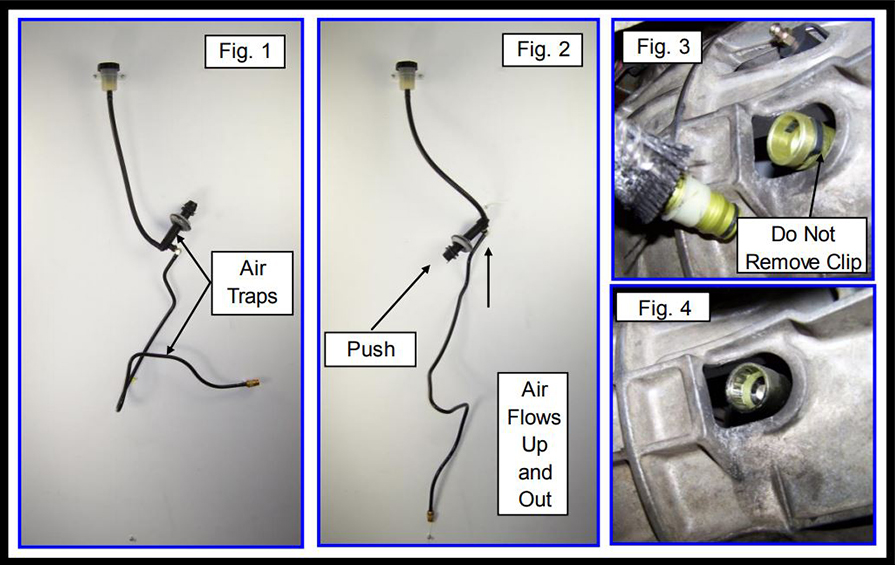
The master cylinder for these applications is mounted on the firewall at an angle that creates an air trap and makes bleeding very difficult or impossible. The pressure line to the Concentric Slave Cylinder (CSC) often includes an air trap in the line as it crosses over the vehicle frame, refer to Fig. 1.
NOTICE: Clutch hydraulic systems or components must be properly and completely bled in order for your clutch to function correctly. Difficult shifting or inability to select a gear is often due to air in the hydraulic system.
CAUTION: Brake fluid damages painted surfaces. Please refer all to cautions and clean up procedures on the brake fluid container. Refer to the vehicles owners’ manual for specific fluid specifications.
- We recommend that you start by bench bleeding the master cylinder and pressure line as a
sub-assembly prior to installing in the vehicle. - Master cylinder replacement. Carefully drive out the retaining pin from the old master cylinder and install the new master cylinder using the new line seal and retaining pin. Inspect the fitting for damage
prior to reusing it. Do not install the master cylinder push-rod at this time. - Install the new O-ring and sliding sleeve on the pressure line connector.
- Remove the reservoir cap and diaphragm boot, fill the reservoir with fresh DOT 3.
- Orient the reservoir, master cylinder and line as shown in Fig. 2 by carefully pulling the end of the pressure line downward, this allows air to flow up into the reservoir and DOT 3 will flow down into the system.
- Using a 4” No. 2 Phillips screwdriver as a substitute master cylinder push-rod, hold the master cylinder in one hand and push the push-rod into the master cylinder approximately 3/8”, repeat several times, refill the reservoir. Continue the process allowing a few minutes for the fluid to flow down into the system. Starting from the bottom of the pressure line, tap on the line with a screwdriver handle, continue tapping up to and including the master cylinder. This helps dislodge air bubbles.
- It will be normal for bubbles to appear in the fluid reservoir as they are expelled from the system. Continue short pushes on the master cylinder push-rod and refilling the reservoir until the push-rod becomes solid and does not compress into the master cylinder body.
- When the push-rod becomes hard and cannot be compressed, check the push-rod movement. The push-rod should compress less than 1/8”. If it can be pushed in more than 1/8” it requires further bleeding, repeat steps 4 thru 7.
- Installed testing: After installation into the vehicle and before connecting the line, push on the clutch pedal lightly with your hand, it should be firm with the less than 1/8” push-rod travel as in step 7. See Fig. 3
- Installation and slave cylinder bleeding. If equipped with the new up-graded retaining clip as shown in Fig. 3, DO NOT REMOVE THE RETAINING CLIP from the slave cylinder connection. Firmly insert the line into the slave cylinder. Fill the reservoir with fresh DOT 3. Attach a line and capture container to the bleed screw. Open the bleed screw on the slave cylinder several turns and allow the fluid to run out until air bubbles are not observed, check the reservoir fluid level during this process. Allow 1½ -2 reservoirs worth of fluid to flow through the system to remove air. Do not allow the reservoir to run dry. Tighten the bleed screw and test for release. If necessary, repeat this step to purge air.
- Fig. 4 illustrates the original connection system. Do not remove the internal retaining ring
PLEASE REFER TO FACTORY SERVICE MANUALS FOR DETAILED APPLICATION
SPECIFIC PROCEDURES.
This bulletin is to assist in the safe and effective servicing of this application. Transmissions, transaxles, and transfer cases are heavy and their safe removal and replacement requires the use of proper tools, equipment and procedures to prevent injury and damage. Always read and follow instruction bulletins and factory service manuals for detailed clutch servicing procedures.
Perfection IB238 - 06/25/2015