
IB242
Installation Procedure for Self Adjusting Clutches (SAC) With Shipping Retainers
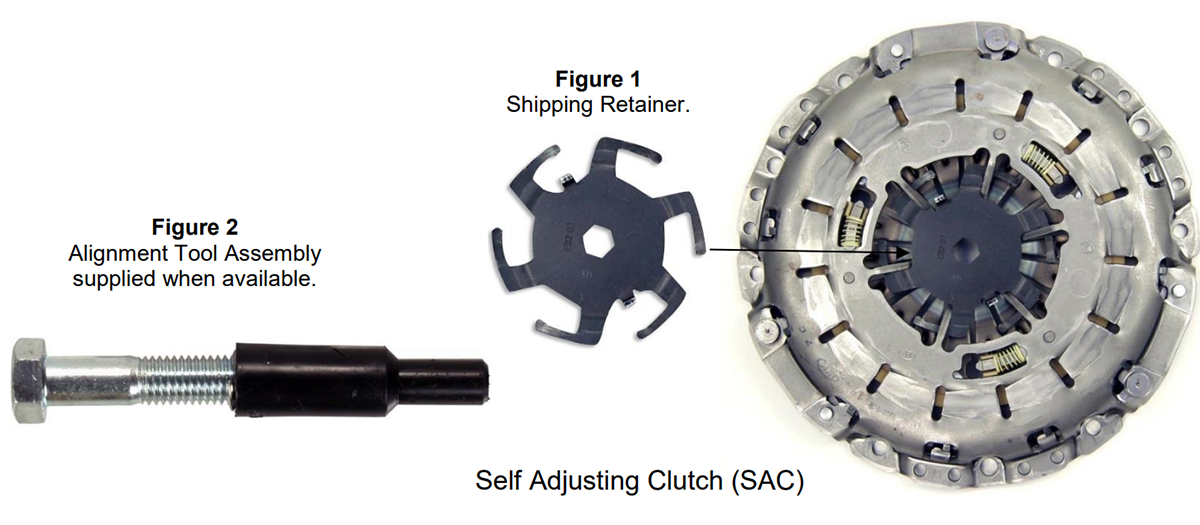
Note: Due to an engineering change, the clutch cover supplied may not be equipped with the shipping retainer (Figure 1). Proceed with the installation. Step 6 will not be required.
WARNING:
DO NOT REMOVE THE SHIPPING RETAINER (FIGURE 1) FROM THE SAC PRIOR TO INSTALLING THE CLUTCH.
- Prepare the flywheel and pilot bearing for assembly.
- Confirm the correct disc orientation to the flywheel. If supplied insert only the alignment tool (Figure 2) into the clutch disc- do NOT install the bolt at this time.
- Install the disc and alignment rool (FIgure 2) in the pilot bearing and flywheel. Do not drop the disc.
- Install the clutch cover assembly on the flywheel, install the bolts finger tight. Verify disc alignment.
- Complete the cover assembly bolt tightening process using a star pattern sequence and tighten to: All M8 Grade 8.8 - 17 Lb/Ft (24 Nm). All M8 Grade 10.9 - 25 Lb/Ft (34 Nm)
- Insert a 9/16" or 14mm hex key wrench into the center of the shipping retainer (Figure 1), and rotate counter-clockwise to remove. The SAC may make a snapping noise during removal of the shipping retainer.
- If supplied, insert the hex bolt into the alignment tool (Figure 2) and pull to remove the alignment tool assembly.
- Complete the installation process.
PLEASE REFER TO FACTORY SERVICE MANUALS FOR DETAILED APPLICATION SPECIFIC PROCEDURES.
This bulletin is to assist in the safe and effective servicing of this application. Transmissions, transaxles and trasfer cases are heavy and their removal and replacement requires the use of proper tools, equipment and procedures to prevent in jury and damage. Always read and follow instruction bulletins and factory service manuals for detailed clutch servicing procedures.
Bulletins and any additional information:
IB242 06/02/2017